Site Meter

Thursday, October 25, 2012

Halloween Special: Plague Makeup

Hello all, Dani here~ 
Earlier this month JesterFoxx from DeviantArt asked me if I could do a walk through for SFXmakeup of a black plague victim. He saw my work from wayyyy back in 2007 for my Halloween costume.
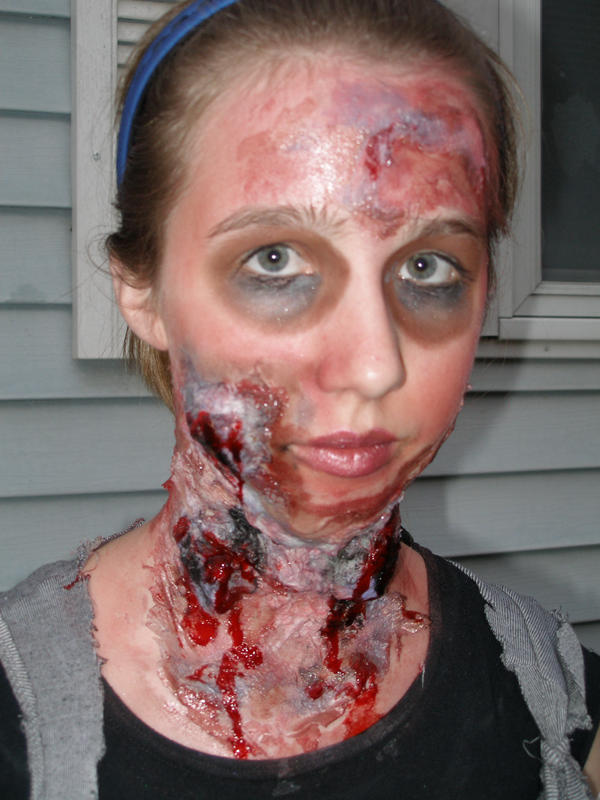
 
(Ohhhh the mistakes I can see now.... xD)

ANYWAY, he wanted to be a plague victim this Halloween and was looking for some guidance.
Welp, here you go! :D


First things first, get all your supplies together.
From right to left:
Prep & Application supplies (alcohol swabs, cue-tips, cotton balls, paper towels)
Construction materials (School glue, scar putty, liquid latex)
Coloring supplies (Cream makeup of red, green, brown, purple/blue, eyeliner of red, brown, black)
Finishing supplies (Fake blood liquid and scabbed, food dye of red and black, spray coloring of black)

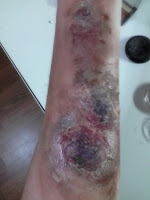
(So that I could take pictures and work without having to stand infront of the mirror, I put the boils on my arm. For realisim they should be mostly around the neck, smaller one on the face if wanted.)

First you need to make sure your skin surface is clean, as that will help the sculpt stick.
Once you're ready, Get messy! Take some tissue paper or the like and coat it in school glue. Try to make it into a paper mache like texture. Before the paper completely dissolves, just stick it on your skin. Smooth out the edge just enough so it has a strong anchor, you want the growth rather round.

Here's mine wet, and then again once it's dry:

 Next, cover the whole mess with liquid latex. 
(Unless you're allergic of course. Be sure to test this first.) 
This will make sure that the makeup will last the whole night, plus it gives you a better surface.

Now is the hard part. Color.

See the awesome thing about color is: If it doesn't look right, just keep working with it. Especially with makeup for monsters/zombies/plague victims to messier it is, the better the over all look will be.
The /bad news/ about color is: it is bloody difficult to explain how to do it properly. Really the best I can do is warn that it /will/ look really awful for quite some time, but stick with it and it will turn out. :)

Start with red for inflammation, add some purple for the bruising, brown to blend all the edges, and just a hint of green for infection.


 Once you're happy with the color, add some scabbed blood (if you don't have this, just mix some black food dye with fake blood and let it dry in a glob.) in a /few/ spots(be sparring!). Then from those points add liquid blood and let it drip on it's own.


Anddddd That's really just it for the boils! :D


Now for the bonus rounds! Face and hands!

For your face, start with a red eyeliner. All around your eye, heavy in the inside corners, and blend it all out. Then color your face to taste, using the brown or grey. Color the hollows of your eyes and cheekbones and the corners of your mouth and nose.

(I was lazy and only did have my face, but that was clever so you can see the difference! ;D )

And if you don't mind the most bitter taste you've ever had, gargle some red food dye. It'll stain your gums and teeth (until the nest time you brush) and looks really wicked. (Do not gargle black, just add a bit around the edges with a cue-tip.)


Now by this time, if you're anything like me, your hands are more painted then your makeup work.
The good news is: you get to cover this up with gangrene! Yayyyyyy!

Spray-on black food dye works best, if not just use the liquid.
'Paint' your hands black, the darkest at your fingertips and fade it out as you move up. Once you've got a base, tip your fingernails in the red food dye then rub it off. It will stain your fingertips and then fade into purple with the black. 

 Now to taste, blend in some green wear the black fades out and drag that up into your wrist.


 And that's it! You're finished!
Mine looked like this, but with more time investment (and a better camera) it can look even better. :)


Good luck and Happy Halloween~

-Danielle

Sunday, October 7, 2012

Cut Scenes: Busybusybusy

So now that the official banner blog has been finished, WE HAVE MORE.

We found ourselves with a very productive weekend!


Our goals for yesterday were to finish these two pieces:
The website banner for me, and Wraith's hoodie for Dani.


While I slaved over my laptop coloring digitally (-shudder-), Danielle was hunched over her art table inhaling the toxic fumes of bleach for hours on end.
So, my project got it's own blog post, and now it's Dani's turn! :D
 Yes, it's true.
Wraith's hoodie is complete. 

Pics or it didn't happen?
Yeah, that's right. We've got pics >D

Here is the step by step process, just like for the mask. Enjoy~

Welp. All Dani did was wrestle with painter's tape. We should have gotten more pictures of it but it boiled down to looking something like this:


Also, lots of goofing around with tape.


But we both worked diligently for most of the evening.

 (The ball python on the laptop is Lilly. She was ever so graciously acting as our model.)


(Yes, I am left handed.)


        (No, Danielle is not left handed.)


 And when we were both finished, we rewarded ourselves with popcorn and hot Asgardian Gods. 
We do what we want!
Cheers, 
April & Dani


Production: Website Banner

Hey everyone, April here.
I finally found the time to finish the colors for the website banner, so now hopefully the website wont look so lame. ^_^"

Here is a quick glimpse at the step process to entertain you further :)

This was the original concept for the banner, in pen by Dani. Creen kind of looks like an alien (Green, HUGE eyed, etc~) , but it's all good. It's what these first drafts are for! :D
Concept by Mutare Ludum :)


These are the super pretty pencils, by Dani. See the improvement from the first?


Next we have the inks. I did them traditionally because I enjoy it more than digital, but for the web-comic, I'm sure you'll see both. :)


Flatting! Easy, tedious, obnoxious, AND TAKES FOREVER. -_-"
Color by April (In Photoshop)


Shading is always fun. Makes the art come to life. Layers suck though, so BEWARE.


Soooo, yeah. This took a round-'bout 5hrs for colors and a few more hours for pencils and inks. Hope you enjoy :) Take a look at it on our website, HERE.
-April & Danielle


Sunday, September 23, 2012

Production: Wraith's Mask


How to turn concept into creation,


Mask making is something new.
But with our character Wraith for Mutare, I knew that one day I would have to bring his mask into reality.

Sadly, I am not an expert in crafting masks or other cosplay props, but I thought I would give it my best. :)

The base is just a painter’s mask that I got from the local hardware store.
The teeth are made with lightweight sculpting clay as a core (to reduce weight) and then a layer of glow-in-the-dark clay. Sculpted the fangs, then I let them dry out some to be easier to work into the jaws.
For the top and bottom jaw, only the lightweight clay was used.

Here’s the first step, which was mostly just getting the basic shapes right and seeing how they fit together.


Here’s how it looked just before baking, 

and just after.

Once everything was cool, I polished up the edges and corners, gave the fangs several coats of glass sealer, and painted the jaws to give them a ‘bone’ look and feel. The mask base was also painted black.


When everything was dry I epoxied the three pieces together and it was complete!


At which point I wore it for several hours straight, grinning and laughing like a maniac.
Our cat, Bynx, seemed quite curious as to what had consumed my face.


There are still some things that I have yet to accomplish.
I have not yet finished the SFX rig that will allow the mask to breathe smoke, and the rest of the costume pieces still need to be made and/or collected.
But for the mask creation itself, I am very pleased.

April and I took it out for an impromptu photo shoot and the pictures can be found on our DeviantART account here: Close up, April’s fav, Second shot.


Want to see it in person? Join us at Youmacon. :D

See you there,
-Danielle

Production: Kickstarter for ImaginosPLUS!


The Kickstarter for ImaginosPLUS is live!


Check it out and thank you for the support of our artistic family. :)


Friday, August 24, 2012

Production: Kickstarter Filming for ImaginosPLUS

Hello everyone~

So as April and I are gearing up for Youmacon, our creative family over at Imaginos Workshop are too!
 

Imaginos Workshop is debuting a comic sampler titled ImaginosPLUS. It will include samples from three of their most popular intellectual properties: Juda Fist, Requiem, and Candy Coated.


Juda Fist

Requiem
Candy Coated


.


So this past week, April and I were asked to help out with the filming of a kickstarter video that will hopefully(fingers crossed!) be funding ImaginosPLUS. Since we are new to the group, and both of us have been in theater for the majority of our lives, we jumped at the opportunity to pull our weight in helping out the team.

So April and I (plus our personal photographer, Erika<3) gathered with Mark Dudley and Joe Cain (members of Imaginos Workshop) to film at Comic City in Pontiac.


(If you haven’t been there before you should check it out. April and I both ended up walking away with our fair share of new comics.)

We were handed a script, and began rehearsing. Aside from the minor distractions from interesting titles that covered the walls and shelves, everything went pretty smoothly.


It was great fun all around, and if Joe’s threat becomes a reality, there may be a behind-the-scenes video somewhere available around the interwebs.


The Kickstarter itself is not yet live, but rest assured, we will keep you updated.

Cheers,
-Danielle